on
Different ways of implementing enumerations in MPS and why they matter
Implementing enumerations
In MPS, enumerations can be implemented using different techniques. The most obvious technique is using the Built-in Enumeration. However, there are two more ways of implementing enumerations: using Accessory models and using Abstract concepts. Each implementation has its own advantages and disadvantages. We go over a list of criteria and, for each implementation technique, discuss its advantages and disadvantages.
In this post, we make an enumeration for setting the visibility of variables, classes, or methods in Java.
The enumeration will contain: Private, Protected, and Public.
|
For those wanting to see the end result: What’s implemented in this post is available on GitHub. |
The different techniques
As mentioned before, enumerations can be implemented using the built-in Enumeration, Accessory models, and Abstract concepts. In this section we show you how the enumeration can be implemented using each technique. For each technique, we create a language.
Using the built-in Enumeration
Implementing enumerations using the MPS built-in Enumeration is one of the easiest to implement.
To do this, create a new language and call it enumsEnum.
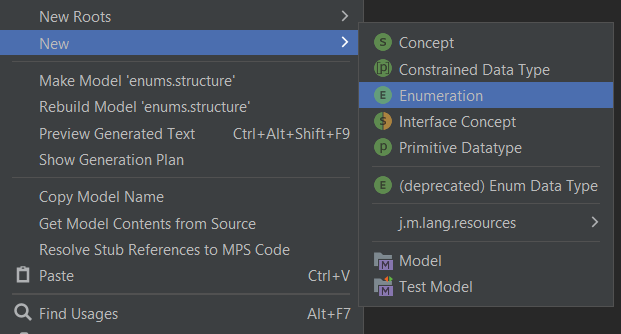
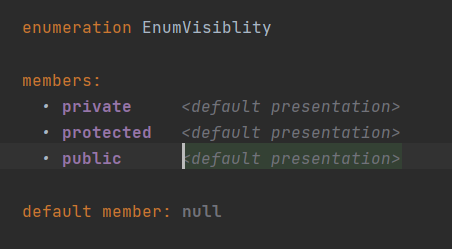
Then, right-click on the structure model and select and define the three visibility types.
|
|
That’s it!
Using the Accessory model
Implementing enumerations through the accessory model can be done in the following way:
Create a new language and call it enumsAccessory.
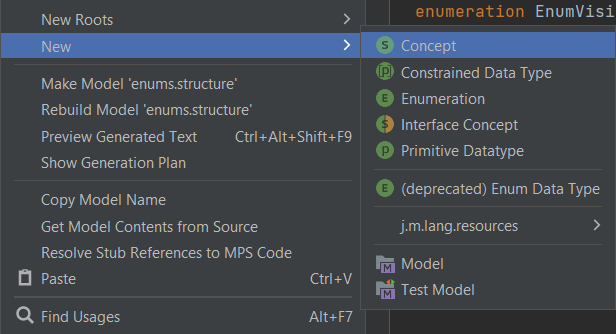
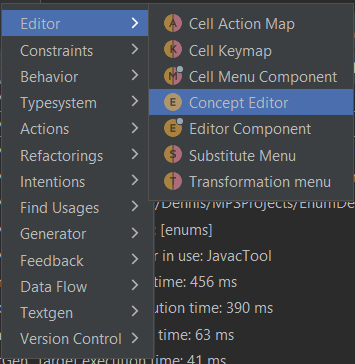
Right-click on the structure model of the language, select .
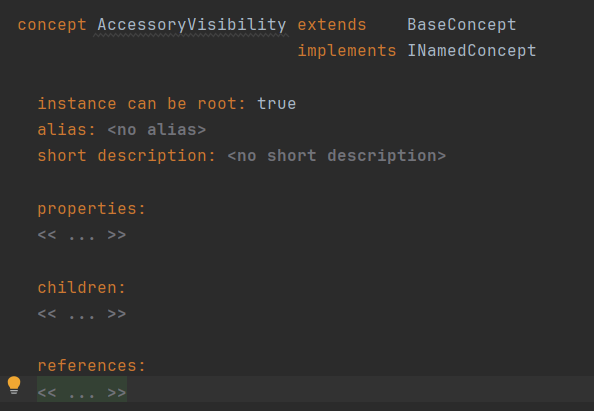
Give it a name (We call it AccessoryVisibility), extend INamedConcept and make it a root concept.
|
|
Then, right-click on your language, select .
In used languages of the accessory model, import your enumsAccessory language and, in Advanced, set Do Not Generate to true.
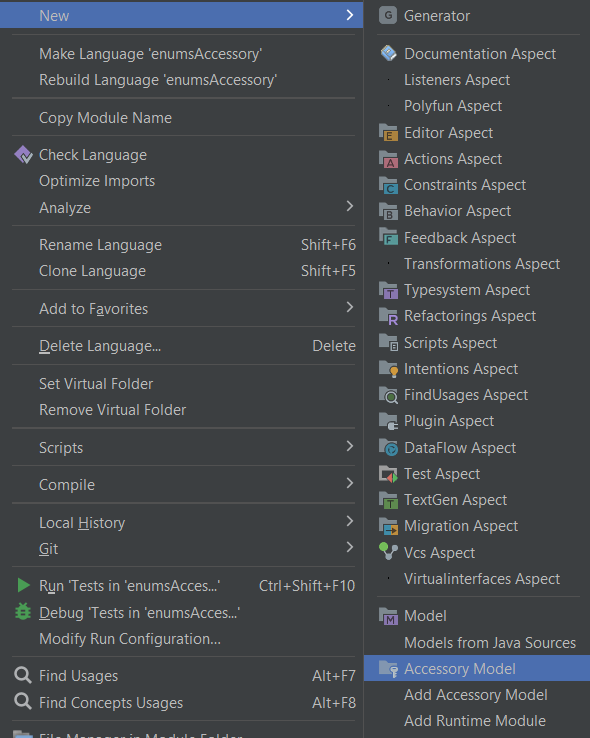
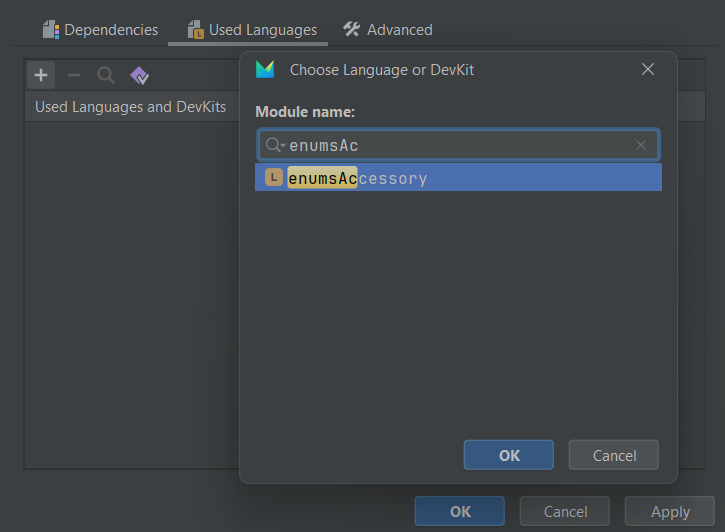
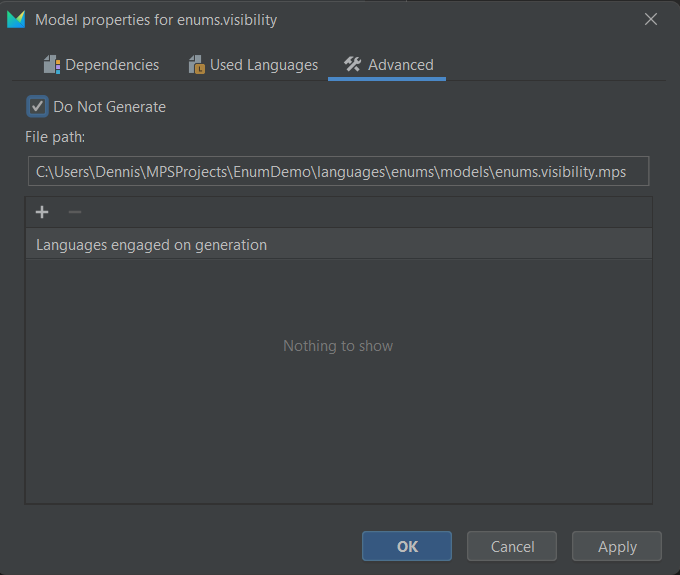
Finally, instantiate the concepts in the newly created accessory model to represent the enumeration members.
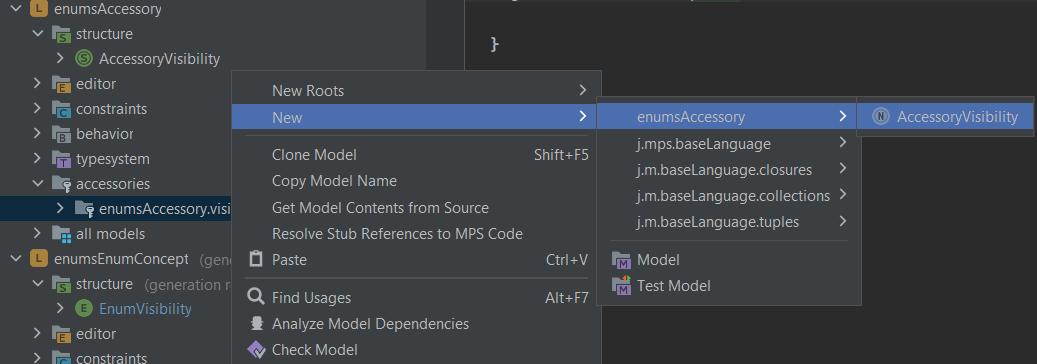
Using the Abstract concept
Create a new language and call it enumsAbstract.
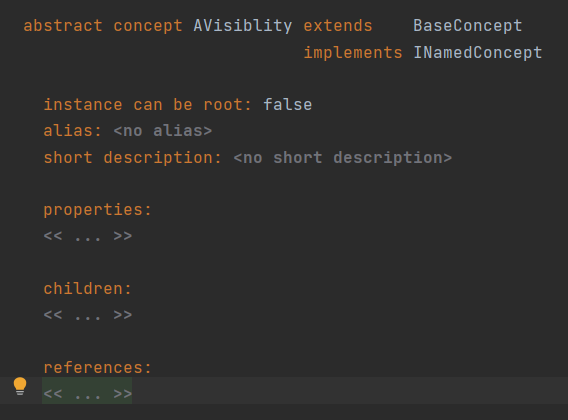
Create a new concept, give it a name (We call it AVisibility) and make it abstract.
We then create new concepts that make the abstract AVisibility concept concrete.
To do this, we add new concepts for each visibility.
This is done in the following way:
-
Create a new concept.
-
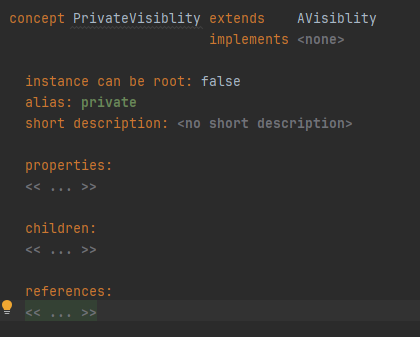
Name it one of the visibility types (We show how to define
Private) -
Extend
AVisibility. -
Give it the corresponding alias
|
|
Now you can extend AVisibility for both Protected and Public as well.
Summary
In the end, if you followed along, you should have implemented the three types of visibility in three languages. In each language, you will have either:
-
The abstract concept
AVisibility -
The accessory concept
AccessoryVisibility -
The built-in enumeration
EnumVisibility
Evaluating implementation techniques
Now, the question is: Why should we use different implementation techniques in the first place? We can just use the built-in enumeration and be done, right?
Well, that’s where this section is for. To evaluate the different implementation techniques, we go over the following criteria:
-
Extensibility
-
Flexibility
-
Working with it in code
-
Accessing information
Extensibility
Extensibility describes the ease with which the enumerations can be extended.
Let’s say a language user wants to add a fourth visibility to their own language: Module.
We show you how this can be done for each implementation technique.
Built-in enumeration
Using the built-in enumeration, it’s going to be tough. Without changing the original language structure itself, this is not possible.
Accessory model
To extend the visibility enumeration with the accessory model, the user can just add a new concept the same way the first three have been added: By creating a new instance in the accessory model of their new language.
Abstract Concept
Similarly, for the abstract concept, another concept can be created to extend the enumeration.
This concept’s name will then be Module, extending AVisibility.
Flexibility
Flexibility describes the ease with which the enumerations can be amended. Let’s say we want to add more information to the different enumerations. For example: we would like to specify which name the enumeration literal should get when generated.
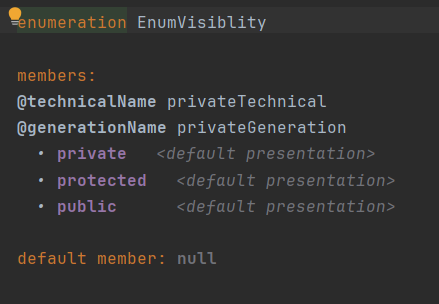
To demonstrate the flexibility of each technique, we add additional information to the enumeration members by giving each member a technical name and a generation name.
Built-in enumeration
For the built-in enumeration, we can do this by adding attributes.
-
First, we create a new language: . Call it
enumAttributes. -
In the new language, create a new concept and call it
AdditionalInfoAttribute. -
To use this concept to store information as an attribute for another concept, we extend
NodeAttribute. -
An error will pop up. Click on
AdditionalInfoAttributeand press Alt+Enter / ⌥+Enter. You can now click "Add Attribute Info". This adds the necessary attribute info.
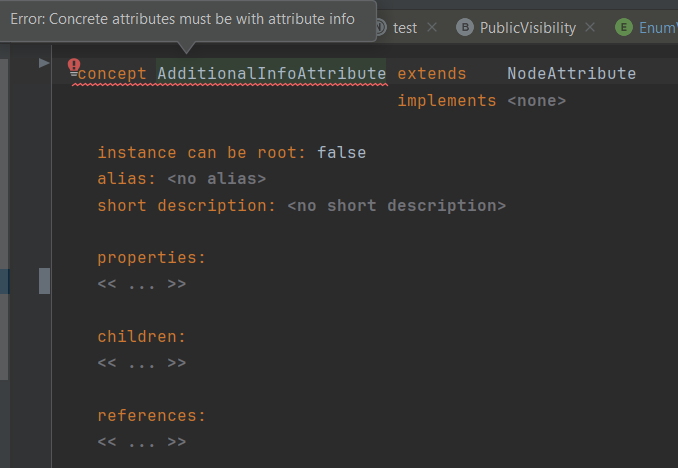
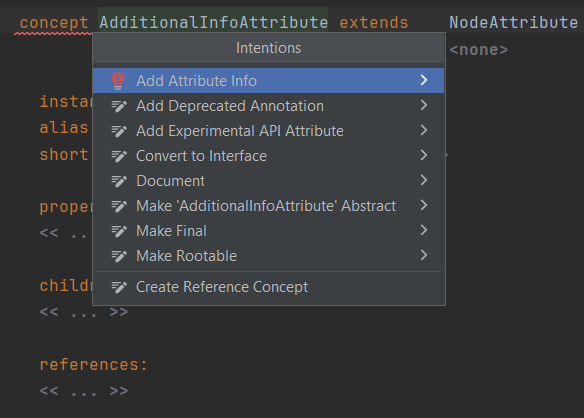
In the @attribute info section we add the following:
-
For multiple, we select
false -
For role, we type
additionalInfo -
For attributed concepts, we import the
EnumerationMemberDeclarationconcept and select this concept here.
Doing so enables us to add attributes to members of a built-in enumeration. Now, we add the information we want to store in this attribute as properties.
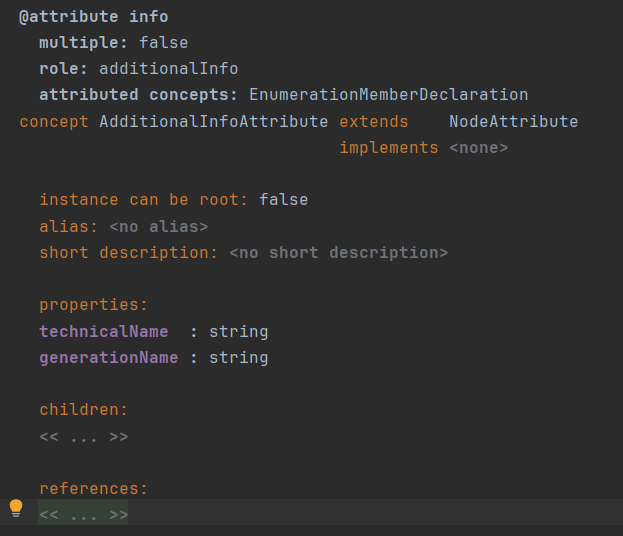
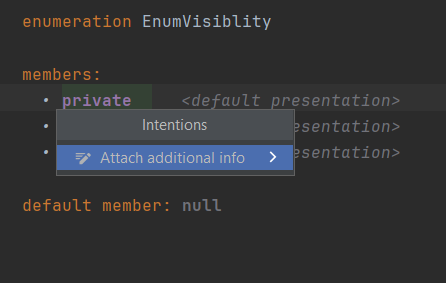
If we actually want to store information using this concept, we should be able to use this attribute for the intended enumeration member.
To do so, we create an intention in the enumAttributes language.
Let’s call this intention AttachAdditionalInfo and create it for the concept EnumerationMemberDeclaration.
As a description we write:
description(node, editorContext)->string {
  "Attach additional info";
}
This intention executes the following code:
execute(node, editorContext)->void {
  node.@additionalInfo.set new(<default>);
}
This sets the additionalInfo attribute we’ve just created to the selected enumeration member.
To actually use this concept, we need to create the editor for this attribute.
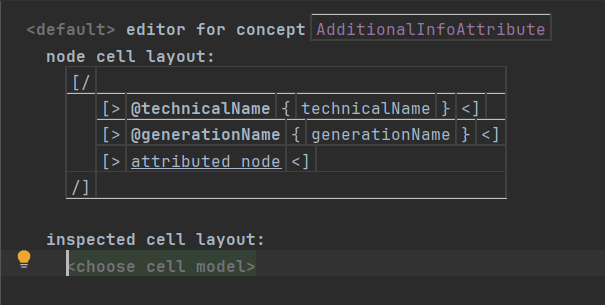
In the editor we add a vertical collection.
In the vertical collection we add 2 horizontal collections for setting the respective properties.
After adding the horizontal collections, we add a new cell in the vertical collection again and here we add attributed node by pressing Ctrl+Space / ^+Space.
It should look like this:
|
|
Now, go to the Module Properties of your original language.
In the dependencies section, add the newly created language (enumAttributes).
Now we can use the intention to add an attribute to the enumeration member:
|
If the intention does not pop up, use Ctrl+R / ^+R to import the |
|
|
Accessory model
For the accessory model, we add properties.
To add the technical name and the generation name, we simply add the properties to the AccessoryVisibility concept.
technicalName : string
generationName : string
Now, for each concept in the accessory model, we can enter its technical name and generation name.
Abstract Concept
For the abstract concepts, we define behaviors.
Go to the abstract concept AVisiblity, click on the + on the bottom left, .
Here, we can define two public virtual abstract string methods called technicalName() and generationName().
Then, for each concrete concept, we can override these methods (by using Ctrl+O / ^+O) to set their respective technical names and generation names.
So, when we create a new behavior for the concrete Public concept we would write here:
public virtual string technicalName()
  overrides AVisibility.technicalName {
  "public";
}

public virtual string generationName()
  overrides AVisibility.generationName {
  "openbaar";
}
Advantages and disadvantages
We have gone over a lot of information in this section. To provide an overview, we discuss the advantages and disadvantages here.
During the implementation of the different techniques, you might have wondered why Abstract concepts do not use properties as well, just like Accessory models.
Using properties is a quick way to store additional information for an instantiated concept. However, these values will be hard-coded and leave no room for values that need to be calculated. Additionally, these properties need to be redefined each time the concept is instantiated. This goes against the principle of an enumeration, which has the same value everywhere. Behaviors provide flexibility and allow you to define values that are consistent among each literal instance. However, when we need to define behaviors for every concrete concept, we are left with a bunch of behaviors, making our project cluttered.
Using an attribute in the built-in enumeration is both difficult to implement and demand the user to provide hard-coded information.
Working with it in code
Now, the enumeration itself does not mean anything yet: We want the different enumeration members to actually say something about the classes/methods/etc. that use this enumeration.
For example, if a class is public, we want it to be visible to every class.
For protected, we only want it to be visible to the same class.
For private, we don’t want it to be visible at all.
We define this logic by writing code using a Behavior.
For each concept, let’s create a new language (Including a sandbox.
We are going to use this in the next section).
Call it {implementation technique} + Behavior (So the language for AccessoryVisibility is AccessoryBehavior) and set the language in which you have implemented the enumeration as a dependency.
In the structure aspect of your new language, create a new concept for which we want to set the visibility. To stay consistent with the example throughout this post, we will use operations. Call it Operation + {the implementation technique} (for example OperationEnum or OperationAccessory), extend BaseConcept, don’t make it root, and implement INamedConcept.
To instantiate multiple Operation nodes, we create a new concept that stores these operations.
In Java, we have a Class which can store multiple Methods. Similarly, we will have a concept Container that stores the Operation nodes.
Create a new root concept and call it Container.
In Container set the corresponding Operation node as a child with a cardinality of [0..n].
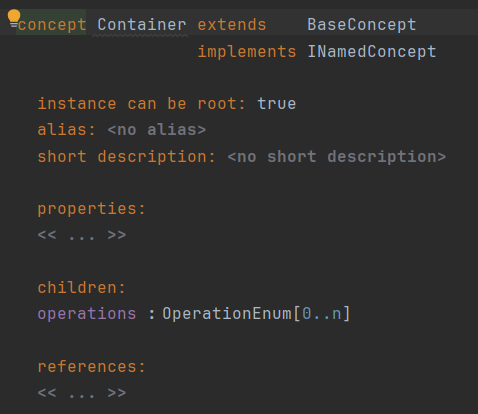
Now, we can create the Behavior for each Operation concept we have created.
Using this behavior, we demonstrate how to define the logic for the enumerations.
Built-in enumeration
In the OperationEnum behavior, we create an enum switch.
The enum switch accesses the visibility of this concept and compares it to the visibility of the other concept should this be needed.
As mentioned before, we want private to not be visible, protected only when the classes are the same, and public always.
Therefore, we write the following code:
public boolean isVisibleEnum(node<OperationEnum> other) {
    return enum switch (this.enumVisibility) {
        private -> false;
        protected -> other.model :eq: this.model;
        public -> true;
    };
}
Accessory model
Similar to the enum concept switch, we can check in the OperationAccessory behavior if the other node is either public, private or protected.
However, for the accessory model we use if-statements.
To access the nodes from the accessory model, we access the pointer of the AccessoryVisibility concept.
|
If you can not find the |
Using this pointer, we compare whether the pointer points to private, protected, or public and write the corresponding code.
The code looks like this:
public boolean isVisibleAccessory(node<OperationAccessory> other) {
  node-ptr<AccessoryVisibility> visibility = this.accessoryVisibility.pointer;
  if (visibility :eq: node-ptr/Private/) {
    return false;
  } else if (visibility :eq: node-ptr/Protected/) {
    return other.model :eq: this.model;
  } else if (visibility :eq: node-ptr/Public/) {
    return true;
  } else {
    return false;
  }
}
Abstract Concept
Using the OperationAbstract behavior, we can define the logic in two ways:
Through a concept switch or by defining behaviors for each corresponding concrete concept.
Through a concept switch
This method is similar to the enum switch we have seen in the built-in enumeration section. Instead, we use a switch statement for concepts:
public boolean isVisibleConceptA(node<OperationAbstract> other) {
    concept switch (this.abstractVisibility.concept) {
        subconcept of PrivateVisibility :
            return false;
        subconcept of ProtectedVisibility :
            return other.model :eq: this.model;
        subconcept of PublicVisibility :
            return true;
        default :
            <no defaultBlock>
    }
    return false;
}
Define behaviors
A different technique would be to define a virtual abstract boolean method in the behavior of the abstract concept AVisibility.
We can then define a behavior for each concrete concept to override this abstract method.
public virtual abstract boolean isVisible(node<OperationAbstract> other);
For the Private visibility concept that extends the abstract visibility concept, we should then override this method in the following way:
public virtual boolean isVisible(node<OperationAbstract> other)
  overrides AVisibility.isVisible {
  false;
}
We can now call this method in the OperationAbstract behavior:
public boolean isVisibleConceptB(node<OperationAbstract> other) {
    return this.abstractVisibility.isVisible(other);
}
Advantages and disadvantages
Using switches to determine the return value is very concise. However, extending these switches is difficult without putting in a lot of effort.
Instead, the usage of behaviors solve this problem. This is less concise but makes the language able to be extended.
Accessing information
Lastly, we want to be able to access the information from the concepts.
We show how this is done by creating a generator for each concept.
First we instantiate the Container instance for each implementation technique, create the root mapping rule, and eventually create the reduction rules in which we access the stored information.
-
Create the editor for the
Containerconcept and instantiate it in the sandbox of your corresponding…Behaviorlanguage. -
Go to the generator of your language and import the
jetbrains.mps.core.xmllanguage. -
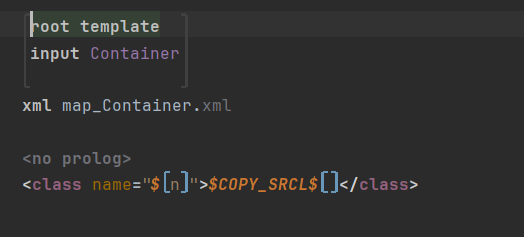
In the root mapping rule select
Containerand create a new root mapping template forxml file.

-
In the root mapping rule, we first create an XML base element.
-
Here, we type "class". Add a
nameattribute and add a property macro to accessnode.name. -
Go inside the element and add a
$COPY_SRCL$node macro for the operations stored in the container.
-
Then, create a new reduction rule for the concept stored in
Container. -
Create an
<in-line template>, instantiate a newXML element, and type "method". -
Add an attribute called "name" and add a property macro on this attribute to retrieve the node’s name.
-
Add an attribute called "visibility" and add a property macro on this attribute as well.
For the abstract concept, it should look like this:

In the respective inspectors for the visibility property macro, we now want to retrieve the generation names we have set in either the behaviors, attributes or properties.
Built-in enumeration
You will notice that when trying to retrieve the generation name stored in the enumVisibility concept, we can not access this node’s AdditionalInfoAttribute.
We can access this node, but we need functionality that helps us do this.
Go to the OperationEnum behavior and create the following method:
public node<EnumerationMemberDeclaration> getEnumerationMemberDeclaration() {
    node<EnumerationMemberDeclaration> enumMember = this.enumVisibility.getSourceNode().resolve(this.model/.getRepository()) as EnumerationMemberDeclaration;
    return enumMember;
}
We can now invoke this method in the inspector of the property macro by typing node.getEnumerationMemberDeclaration().
|
When using this in your own project, be sure to put this method in a more central place. This way this method can be called from more places than just |
Using this method, we can access the attributeInfo of the built-in enumeration (If this is not accessible, import AdditionalInfoAttribute using Ctrl+R / ^+R)
In the inspector of visibility in OperationEnum, type: node.getEnumerationMemberDeclaration().@additionalInfo.generationName;

Accessory model
For the accessory model, we can simply access the property of the AccessoryVisibility concept. We first get the AccessoryVisibility concept from OperationAccessory and then get it’s generation name:
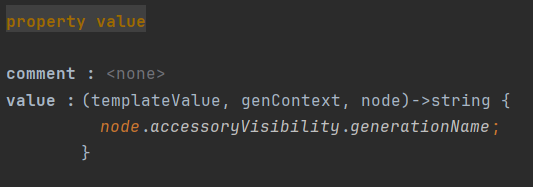
Abstract concept
For the abstract concept, we call the method in the concrete concept that overrides the generationName() method. We do this in the following way:
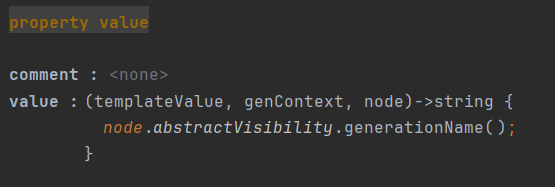
Using the generator
Now, if we go back to the sandbox in which we instantiated Container, we can press Ctrl+Alt+Shft+F9 to see a preview of the generated text. Using any enumeration, it should look like this:


That’s it! 😄
Conclusion
In this post, we have looked at three different implementation techniques: The built-in enumerations, enumerations using the abstract concept, and enumerations using the accessory model. Now the question is: which technique should you use?
As most things in this world: It depends. This all depends on your use case.
Using the built-in enumeration is very easy, but very often bites in the long run — languages tend to evolve and split up, then enums get messy. Also, built-in enums are hard to migrate. Accessories are a good compromise between additional effort and flexibility. Abstract has the most flexibility, but also takes the most effort.
Our advice: Outside corner cases, don’t use built-in. Choose between accessories and abstract according to your needs, these two are also easier to migrate between.
Additionally, to help you figure out which technique you should use, we highlight the advantages and disadvantages in the following table.
| Built-in enum | Accessory model | Abstract concept | |
|---|---|---|---|
Extensibility |
❌ Can’t be extended unless the original language is modified |
✅ Easy to extend through a new instance of the accessory concept. |
✅ Easy to extend through a new concrete concept. ❌ Requires a bit more effort than the accessory model |
Flexibility |
✅ Consistent values among instances. ❌ Difficult to implement. ❌ Values are hardcoded. ❌ Does not allow values to be calculated. |
✅ Easy to implement. ✅ Values are consistent among each instance. ❌ Values are hardcoded. |
✅ Easy to implement. ✅ Support multiple methods for adding additional information. ❌ Too many behaviors clutter the project. |
Working with it in code |
✅ Concise using the enum switch. |
❌ Code is hard to read. ❌ Not extensible without effort. |
✅ Concise using the concept switch. ✅ Can be extended using behaviors. ❌ Too many behaviors if every enumeration literal needs a behavior. |
Accessing information |
❌ Requires effort to access the node with the information. |
✅ Easy to access information using properties |
✅ Easy to access information using behaviors |
Thanks for reading this post and have fun implementing!
About Dennis Vet
I am a Junior Model Driven Engineer at F1RE. I started working for F1RE January 1st, 2024. After completing my master’s in Software Engineering with a thesis about Domain-Specific Languages, F1RE was the most logical step for my career.
You can contact me at dennis@f1re.io.
