JetBrains MPS Build Script Creation and Debugging Checklist
Table of Contents
We will specify a checklist of steps for creating build scripts and one for fixing issues with them.
Glossary
This section explains how the post will use the following terms. Some of them are different than the official MPS structure but we feel they make more sense the way we write them.
- Ant script
-
Generated file that executes builds using Apache Ant.
- Gradle script
-
Script that allows users to use generated ant scripts easily.
- MPS Project
-
All MPS modules that we want to build together.
- Build model
-
It’s called
BuildProjectin MPS. It is the root node that we as language engineers use to define how our MPS project gets built. - Build project
-
Overarching structure that encapsulates everything relating to the building of an MPS project, includes Gradle and Ant Scripts, and MPS Solutions that contain build models.
Rationale
Dealing with MPS build models is like doing a slow, tedious ritual that sacrifices one’s sanity in the name of the JetBrainian Gods so our users don’t suffer a heart attack once they open MPS and see a sea of red squiggly lines. We can also run a CI/CD pipeline with our project in it which a cool bonus.
Remembering all the different things that we need to do when writing them is very hard and remembering every little strange detail that can go wrong when debugging them is almost impossible. That’s why I will try to compile a list that we can use so we can streamline our process of sacrificing our nerves for the safe passage of our innocent users.
Build Environment Structure
While the structure I will use for this example is not official canon from JetBrains it is widely used and accepted into the bigger MPS projects I have seen so far. It is usually paired with Gradle for easier dependency management and execution of its ant scripts.
This structure tries to remove as much responsibility from the users as possible, thus it transports us, language engineers, to the third circle of Hell where pain is constant and a three-headed dog is chasing us around trying to use us as a chewing toy.
But it works, so I will not question the will of the legendary heroes that braved this wilderness before me.
The structure is as follows:
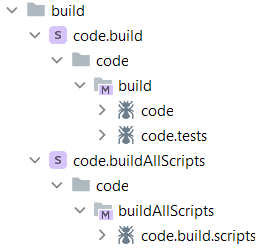
Figure 1. Build project structure
In the following paragraphs I will explain every build model, what ant script it generates does and how we should deal with them.
Build All Scripts Model
This is the simplest model.
The ant script it generates is usually named build-scripts.xml.
Its idea is to be created once, built, so it generates it’s ant script and left alone.
It’s only purpose is to build the solution that has the other models.
This solution would later generate the other ant scripts we need to build our project.
That way we have an intermediary between the more complex build models and the user of our project. We would commit the generated ant script into our version control system so that the only thing a user would need to do is to run one command in the command prompt. With this, we don’t have to commit the other two ant scripts into VCS, which means that changes to the project will always be recognized and built when we update our project with new commits.
Build Model
This is usually the largest model.
The ant script it generates is usually named build.xml.
It contains everything that our MPS project needs to have in order for it to function.
We list all dependencies the project needs to run properly.
The dependencies' build models are referred to in there, so they can be built when needed.
Then we specify the structure of our build project - all modules we want built, whether they will be put in one or multiple plugins and how these plugins will be packaged.
They are usually packaged into zip or jar files that can be easily distributed.
Build Tests Model
This model is slightly different from the other two.
The ant script it generates is usually named build-tests.xml.
In it, we specify the modules that have tests for our project.
With it, we can make sure our MPS project works without opening MPS, or if we have a CI/CD pipeline it can make sure that merges we do don’t break the project.
In it, we usually specify the dependencies of the testing solutions, which will include the build model of our project, as well, and the module-tests plugin which allows us to execute tests from outside of MPS.
The different thing about this build model is that we do not package our solutions, but we put them in the default layout as modules.
Then we use the test modules configuration to select which modules will have their tests executed and some additional options that are explained in a bit.
Build Project Creation Checklist
Probably the easiest way to create working build scripts without giving much thought is to steal be inspired by existing models in working projects. Nevertheless, we will specify a short checklist when creating these models, so we can demystify their various options and aspects.
Creating the Build Project in Gradle
-
Copy the gradle script from Kolja’s sample project.
This script contains several tasks that download MPS and the dependencies needed to build Kolja’s project. This way users don’t need to download many things when getting our project, even if they don’t have MPS installed. We will go through it and change it where needed, so it works for our project.
Gradle Setup Explained
The gradle file can be split up in two parts - setup, that would prepare all repositories, dependencies, variables and other "non-movable" parts and tasks, that define how it’s going to get executed, and what we can do with it. This section will explain the setup part of the file.
import de.itemis.mps.gradle.BuildLanguages
import de.itemis.mps.gradle.GenerateLibrariesXml
import de.itemis.mps.gradle.TestLanguages
These are the imports to the MPS Gradle plugin, which allows us to build MPS externally.
Update Maven Repository
buildscript {
    repositories {
        maven { url 'https://artifacts.itemis.cloud/repository/maven-mps/' }
        mavenCentral()
    }

    dependencies {
        classpath 'de.itemis.mps:mps-gradle-plugin:1.18+'
    }
}
Following this we have the repository that contains the mps gradle plugin. We are going to change it because they updated its location.
-
Update the repository to the ones specified here.
Project Information
group 'de.itemis.mps.build.example'
description = "sample project for building MPS projects"
This is information on our project, so we change them according to it.
Build Scripts Location
File scriptFile(String relativePath) {
    new File("$rootDir/build/$relativePath")
}
This is a function that sets the structure on where our build files must be located. We can change the directory if we’d like the scripts to be in another location.
JDK Check
// JDK_HOME required for adding tools.jar into classpath of the forked ant process
if (!hasProperty("jdk_home")) {
    def java_home = System.properties['java.home']
    def jdk_home = java_home
    if (!file("$jdk_home/lib/tools.jar").isFile()) {
        jdk_home = jdk_home + "/.."
    }
    if (!file("$jdk_home/lib/tools.jar").isFile()) {
        throw new GradleException("Was not able to locate jdk home folder. Use 'jdk_home' project variable to specify JDK location explicitly. Current JAVA_HOME is: $java_home")
    }
    ext.jdk_home = jdk_home
}
This is a function that check if we have jdk installed on our machine. This is the only thing we can’t install for the user.
Update MPS Version
//define directories
ext.artifactsDir = new File(rootDir, 'artifacts')
ext.libsDir = new File(rootDir, 'libs')
ext.mpsDir = new File(artifactsDir, 'mps')

ext.mpsVersion = '2018.2.4'
These are variables that are going to determine where gradle is going to download dependencies and the MPS version we are going to pull. We can change them if we want a different project structure.
| Make sure all versions match the MPS version we use. |
-
Change the
ext.mpsVersionvariable.
Set Configurations and Dependencies
configurations {
    ant_lib
    mps
    mpsArtifacts
    libs
}
These are names for configurations of dependencies for gradle.
We can specify more if we want more control or use mpsArtifacts or libs, depending on the type of dependency.
-
If you want more control over the script and more dependencies: add configurations for each dependency.
dependencies {
    ant_lib "org.apache.ant:ant-junit:1.10.1"
    mps "com.jetbrains:mps:$mpsVersion"
    mpsArtifacts "org.iets3:opensource:0.1+"
    libs "de.itemis.mps.build.example:javalib:1.0+"
    libs "org.jdom:jdom:2.0.2"
    //libs group: 'org.javamoney.moneta', name: 'moneta-core', version: '1.2.1'
}
Here we specify the dependencies of the project.
If we want to add more dependencies follow the example given with org.iets3:opensource:0.1+.
We can add more dependencies to mpsArtifacts and use the already existing resolveMpsArtifacts task, or we can create our own tasks and dependencies for more control over them.
-
We don’t need the first
libsdependency, so we should delete it.
repositories {
    maven {
        url 'https://artifacts.itemis.cloud/repository/maven-mps/'
    }
    mavenCentral()
}
Here we specify the repository where Gradle will search for the dependencies of the project.
mavenCentral should have everything we’d need but if we need something more specific we have to add it following the example of the itemis repository.
We can add mavenLocal() to the list of repositories, but it is a bit debatable.
Generally we should avoid it, but there are some special cases where it could be needed.
|
-
Update the repository to the ones specified here.
ext.project_home = '-Dproject.home=' + file(rootDir).getAbsolutePath()
ext.mps_home = '-Dmps.home=' + mpsDir.getAbsolutePath()
ext.artifacts_dir = '-Dartifacts.root=' + new File(rootDir, 'artifacts')

// default arguments for ANT
ext.defaultScriptArgs = [mps_home, project_home, artifacts_dir]
ext.buildScriptClasspath = project.configurations.ant_lib.fileCollection({true})
    + project.files("$project.jdk_home/lib/tools.jar")
These are the external variables gradle needs in order to run MPS builds.
We don’t need to touch anything there, but if we add more folders for our project we should add them in the ext.defaultScriptArgs variable.
Gradle Tasks Explained
The following code defines the tasks we, or our pipelines, are going to call when we want to build our project. Very little needs to be changed with them.
Generate Libraries XML Task
task generateLibrariesXml(type: GenerateLibrariesXml) {
    description "Will read project libraries from projectlibraries.properties and generate libraries.xml in .mps directory. Libraries are loaded in mps during start."
    defaults rootProject.file('projectlibraries.properties')
    destination file('code/.mps/libraries.xml')
    overrides rootProject.file('projectlibraries.overrides.properties')
}
This task in needed if we have external libraries for our project.
task resolveLibs(type: Copy) {
    doFirst {
        delete libsDir
    }
    from {
        configurations.libs.resolve()
    }
    into libsDir
}
With this task gradle downloads the libraries we’ve specified in configurations.libs and puts them in the correct folder.
Resolve Dependencies Tasks
task resolveMps(type: Copy) {
    from {
        configurations.mps.resolve().collect { zipTree(it) }
    }
    into mpsDir
}


task resolveMpsArtifacts(type: Copy) {
    from {
        configurations.mpsArtifacts.resolve().collect { zipTree(it) }
    }
    into artifactsDir
}
These tasks download MPS and MPS dependencies we need for our project.
In this case the mpsArtifacts has org.iets3:opensource:0.1+ as specified in the dependencies.
Setup Task
task setup {
    // We resolve MPS not for the users to use it but for the distribution packaging script to be able to refer to it.
    dependsOn resolveMpsArtifacts
    dependsOn generateLibrariesXml
    description 'Set up MPS project libraries. Libraries are read in from projectlibraries.properties file.'
}
This task prepares our project and MPS, so it can have the libraries we need downloaded and in the correct places.
Build Scripts Task
//idea: run tasks for the generate .xml files directly
task allScripts(type: BuildLanguages, dependsOn: [resolveMps, resolveMpsArtifacts]) {
    scriptArgs = defaultScriptArgs
    scriptClasspath = buildScriptClasspath
    script scriptFile('de.itemis.mps.build.example.all.scripts/build.xml')
}
This task runs the allScripts ant script.
That way we have the main ant script prepared for our MPS and machine.
-
Change the location of the
scriptFilevariable according to where our ant script files will be placed.
Build Task
task build_languages(type: BuildLanguages, dependsOn: [allScripts, resolveMps, resolveMpsArtifacts]) {
    scriptArgs = defaultScriptArgs
    description = "Build all MPS language"
    scriptClasspath = buildScriptClasspath
    script scriptFile('de.itemis.mps.build.example/build.xml')
}
This task builds our MPS project.
-
Change the location of the
scriptFilevariable according to where our ant script files will be placed.
Run Tests Task
task run_tests(type: TestLanguages, dependsOn: build_languages) {
    scriptArgs = defaultScriptArgs
    scriptClasspath = buildScriptClasspath
    script scriptFile('de.itemis.mps.build.example/build-tests.xml')
}
This task builds our project, because of the dependsOn parameter, and runs the tests we will specify in the build-tests build model.
-
Change the location of the
scriptFilevariable according to where our script files will be placed.
Depending on the size of our project we might need to write a more complex one by ourselves, but for the most part this is a good base. We can also use this repository’s build model for reference if we have any questions about variables, directories and naming.
Preparing Our Build Models In MPS
After we are ready with Gradle we can move onto MPS where we will define our build models.
Clean Up Entire Project
Before we start with the actual build solutions we should make sure our MPS project is cleaned up. No dependencies should be specified that are not used, and there shouldn’t be any errors.
-
Add the dependency plugins that gradle downloads as libraries in our MPS project.
-
-
Add each library as shown in the image below
-
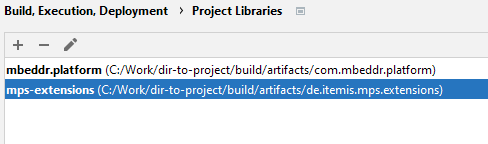
Figure 2. Project Libraries
-
Clean up our project.
-
Check Projectfor errors/warning.
-
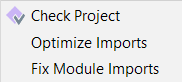
Figure 3. Project Checks
-
Clean up dependencies.
-
Optimize Importson every module (see Project Checks). -
Module dependencies.
-
Model dependencies.
-
Model used languages.
-
-
Make sure everything works normally.
| running our tests should be sufficient, that is, if we have good enough tests :) |
Create the Build Solution
-
Create a build solution.
Build Model
-
Add a
build projectroot node.
Now that we are in the build model we can begin the fun(torture).
-
Specify name and where it should generate its ant script file.
-
Create macros for every major folder the script is going to use.
-
Add dependencies.
| Dependencies should use the artifacts that gradle downloads because we don’t know if our user would have them installed. We would have to import the build model of the projects we are using. |
Project Structure
-
Create
mps groups.-
Populate our modules into them based on our structure.
-
Easiest way to populate all our modules is to add the module file in the load from node and call the Reload module from disk intention.
|
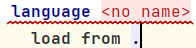
Figure 4. Load from module variable
-
Add
idea pluginto the project structure.-
Add the groups we created into the
contentnode. -
Add our dependencies.
-
-
Add our preferred packaging method in the
default layoutnode.
Usually each plugin is packaged in a zip file. Use auto packaging unless we have very specific needs on the directory configuration.
|
-
If we use any external libraries add them to our build layout node.
-
Add
mps settingsnode to the end of the build script.
-
The bootstrap flag is used when there are issues with circular dependencies that have to exist.
An example of a circular dependency that can’t be avoided is if we have a language module with a separate runtime module.
The test generation flag is used to test whether generated files match the files on disk.
For a more in depth guide on cleaning up circular dependencies we can follow the official MPS documentation on the topic.
|
-
Increase the max heap size for a faster build.
Build Tests Model
We can follow these steps to create both the allScripts and build solution but if we want to create a build model for the tests there are some differences.
-
Add the
module-testsplugin in theuse pluginsnode. We can find it in thejetbrains.mps.build.mps.testslanguage.
-
Add our project’s build model as a dependency.
-
Create an
idea pluginas usual with only the testing solutions that we want to execute.-
Add the
jetbrains.mps.builddependency to it.
-
-
In the
default layoutwe specify the solutions asmodules. -
Add a
test modulesbuild aspect.-
Add the modules we want to execute in the
run tests from modulesnode.
-
The halt on failure flag stops the execution of the rest of the tests if one fails.
The load additional idea plugins flag is to explicitly add IDEA plugins when executing the tests.
|
Build Model Debugging Checklist
As with anything, when debugging, the first thing we should try is the easiest options and go from there by increasing the complexity of the solutions, unless we know the exact problem we are trying to fix. Between each steps of this list we should try to run our build models to check if the problem still persists.
Run the build model by rebuilding your build solution, right-clicking on the root node in our Logical View and selecting the Run project.buildscript option.
|
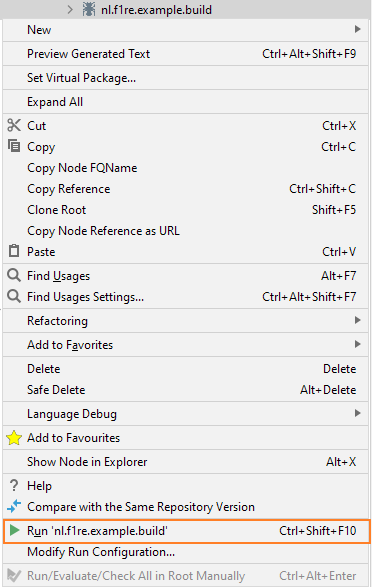
Figure 5. Run build model in MPS
| At the end of this checklist there will be a second checklist that deals only with gradle related issues. |
-
Reload Modules From Diskintention on the top of the build model
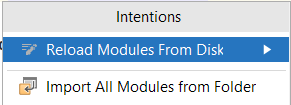
Figure 6. Reload modules from disk intention
| We’ll be using this a lot. |
-
If we have any external libraries: make sure that the module that is using them has access to them via a dependency or add them manually using the
resources filesnode -
If we have any circular dependencies that we can’t remove: make sure that the
bootstrapflag in themps settingsnode is set to true. -
Invalidate Cachesand restart MPS. -
Check Projectand fix any errors that are connected to the build model failures. -
Optimize Importson project.
Optimize Imports works most of the time, but not always.
Before using it commit your changes because it’s almost impossible to undo changes done by it.
|
-
Rebuildproject. -
Make sure tests execute successfully.
-
Reload Modules From Diskon the entire build model.
Sometimes this action removes dependencies our modules actually use, so it’s a good thing to rebuild after that and make sure everything works as it should be. hint: tests are our friends
|
-
If we have any Runtime solutions: make sure they are set as runtime solutions in their respective language
module properties-
Reload Modules From Diskon the entire build model
-
Now it’s time for a more hands-on approach.
-
Make sure every dependency/used language in every module/model has a purpose; else - clean it up.
-
Reload Modules From Diskon the entire build model.
-
-
mpsclean
| If you don’t know what that is, prepare for a treat. This blog contains the not-so forbidden knowledge of a legendary MPS wizard whose name only scares away MPS bugs. |
Experimental Debugging
Now if we’ve done everything up to here we start entering strange waters full of mysteries and adventure. I’d suggest going through the list once more before starting experimenting.
"Experiments" I’ve found helpful:
-
Go to build.xml, find where it gets stuck from MPS, and make sure everything is okay with the engaged modules of the task.
When giving error messages ant usually says in which task it got stuck.
In the build.xml file go to this line.
It usually stops on the task that failed.
When we are at the correct task, go through all folder variables and make sure that they exist and are accessible to the project.
They should be specified in the MPS build model macros.
If you think some variables make no sense try to make more macros to the folders the project uses.
|
-
Make sure the script uses the correct folder macros. This might include a trip to .
| If we think that folder macros are the problem we can try to hardcode them in the .xml file and run it from MPS. This won’t solve the overhanging issue with the ant script, but we will know if it stems from the macros or not. To hardcode them follow the format other folders use and set the absolute path to the engaged modules. |
if we have a macro
${artifacts.mps}/languages/baseLanguage/closures.runtime.jar
Instead of letting ant deal with folder variables set the entire path to the correct folder:
C:/Program Files/JetBrains/MPS 2021.3/languages/baseLanguage/languages/baseLanguage/closures.runtime.jar
-
Comment out parts of the build model so there are less "moving parts".
-
add more explicit dependencies in the
pluginnode’sdependencies. -
If the build tests script is not executing our tests properly go to the build model that has the modules we will test. In the
default layoutnode - if all plugins are packaged in zip files - add a copy of allpluginsin the root of the layout. -
Try to "hardcode" the ant script so it works.
Debugging ant scripts that have to run in gradle.
Most issues we will deal with here come from a problem within MPS, but there are some specifics we have to watch out for when dealing with gradle as well. This checklist assumes that the build model works in MPS.
First off we have to understand that MPS does a lot of automagic things that help us when we have it open. This does not happen when we are trying to execute these scripts in gradle, which means that whatever it is we are building it better has everything it needs in an organized, easy to access folder and be the correct version, or else.
When building our gradle script we assume that whoever is going to use it will not have everything installed on his/her machine. That means it has to be able to download everything by itself because users should not be allowed the freedom to get the dependencies by themselves.
-
If we are using IDEA - invalidate caches and restart it
-
Try using it from a different environment (e.g. if we’re in IDEA, call the gradle script from PowerShell, or CMD and vice versa.)
-
mpsclean
-
Make sure all variables in the gradle script are correct.
for more solutions to errors with build script go check out Sergej Koščejev’s blog. Also check out Itemis' platform scripts explanation if you’re interested in them.
This list will most likely expand with the passing of time as I gather more knowledge and experience. If you find I’m missing something you want to share, please let me know at my email.