JetBrains' MPS Getting Started Part II
Table of Contents
Welcome back to my series of blogs on Getting Started with JetBrains' MPS DSL development. In this part we will explore references, the node factory, behaviour and type system aspects of DSL development.
Library Client
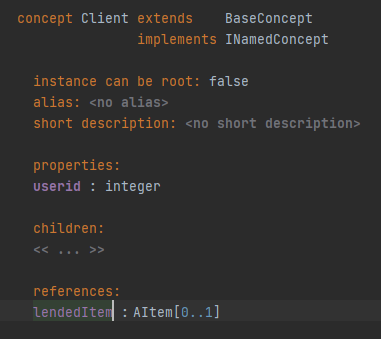
Let’s create a Client concept that implements the INamedConcept, has a userid integer property and contains an AItem reference that will hold the borrowed item of the client.
Figure 1. Client Concept
And set up it’s Editor to look like this.
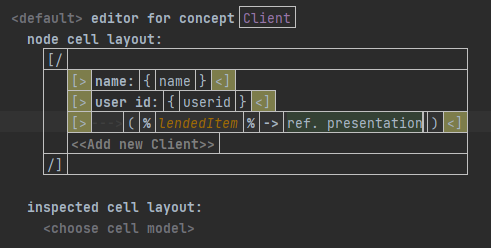
Figure 2. Client Editor
One new thing about the editor now is the reference node. We have grouped it with an indent cell in the beginning, which is created by writing --→, that will help with distinction of the editors and have set the ref. presentation node to identify the node in question.
Another new thing - We can set up styles to help users with our UI. The << Add new Client >> cell is a string constant that is there to help the user. It is used as a placeholder to indicate to the user where he can add new client nodes. We will create a style for this cell that colors it grey so users understand that there they can do this action. In the Logical View create a new Stylesheet: . Call it Base and in it add a new style called AddNewItem. In it add an element text-foreground-color with value gray.
| Ctrl+Space For the mighty code completion tool. |
After that go back to the editor and click on the cell that we want to change the color of. Open the inspector and add the AddNewItem style to it.
| Alt+2 to open the Inspector the pro way. |
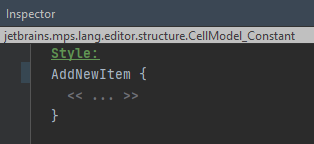
Figure 3. Cell style
We want to do a similar thing for the reference part: click on the lendedItem cell and inside the inspector find the Referent node cell: part and add text* to it that says << lend out item >>.

Figure 4. Reference alt text
In order to use this client concept we will have to add it as a child list to our LibraryContainer concept like we did the AItem list in the previous blog post and we can add the AddNewItem style to it as well.
Now since we will be using a userid property we need to set up and automatic increment for them. This can be done by defining a Client Node Factory.
Node Factory
Node factories allow for customization of node instantiation. Node factories are similar to constructors, but within them we have access to parent, sibling and child nodes. We can swap and edit nodes and a lot of other more complicated stuff.
Create a new Node Factory Action either from the language logical view or the language aspect bar inside an editor.

Figure 5. Language aspect bar
Name the factory ClientFactory and add a set-up element.
| If you click on the method parameters and open the inspector (Alt+2) you can see a description of every parameter inside. |
The method we are about to write will get the list of children the enclosing node has that are of the Client concept, retrieve the last entry, get it’s user id, add 1 to it and set it as the newNode’s id. If there are no children the userid will become 1. This is the code:
newNode.userid = enclosingNode.children.ofConcept<Client>.last.getUserId() + 1;You might notice that there is an error since we haven’t defined a getUserId() method yet. This is the next part we will be looking into now.
Behavior
The behavior language aspect allows us to define common operations into static, virtual, instance and constructor methods on nodes. The methods are implemented in BaseLanguage.
| BaseLanguage is MPS' extension of Java. |
Create a behavior aspect for our client concept and in it we will define this method with one line of code.
public int getUserId() {
  this.userid;
}
There is no need to write the return statement because BaseLanguage automatically returns the last statement.
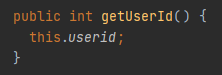
Figure 6. getUserId behavior instance method.
Currently this method is very simple and not necessary, but we added it just so we can show how the behavior works.
The behavior aspect is used if we need polymorphism, and if the code is really a part of the DSL, i.e. producing a semantically relevant result in context of the domain. In our case a good example of that would be LibraryContainer.getBookItems().
|
Now that this method exists we can use the switcher to go to the Node Factory with Ctrl+↹ and refreshing error with F5 so it finds the method. At the end we can build the language with Ctrl+F9.
TypeSystem
Finally we will cover the type system language aspect in this blog. The type system assigns types to the nodes the user has written with our language. These types can then be used for:
Possible Type System uses
-
Finding type errors
-
Giving information for refactorings.
-
Specifying (in)equations to our nodes.
-
Substitution rules for nodes.
-
Checking rules for error patterns.
We will create a checking rule that doesn’t allow the user to lend out an item that has already been given out.
Create a new typesystem by right-clicking on typesystem under our Library language in the logical view and select . Call the checking rule check_Client and have it applicable for concept = Client as client. Then add the following code to the do{} section.
foreach clientCheck in client.ancestor<concept = LibraryContainer>.clients {
  if (client != clientCheck && client.lendedItem == clientCheck.lendedItem && client.lendedItem.isNotNull) {
    error "Cannot lend out already lent item" -> client;
  }
}
What this rule will do now is that every time a client is edited this foreach loop will check first if the reference is not null, then if the lendedItem reference is matching with any of the other client’s references. If it is an error shows up that says that we Cannot lend out already lent item.
What you can do as practice now is to set up an Intention that helps the user remove the lent item reference from a client node. If you want to see the project right now see the link below.
| To avoid code duplication extract the checking rule into a runtime and use it as a way to apply a condition to the intention pop-up. |
The MPS project of our Library will be stored on gitlab and can be accessed through here.